In my previous post I mentioned I was making my FIRST EVER quilt from
Amy Karol's book
"Bend the Rules Sewing". I have finally finished it - hurrah.

Before I read about the lap quilt in the book (and a few articles in
Sew Hip) I never thought making a quilt would be something I could do - they seemed to big and time consuming and intimidating. Surely only proper grown ups with fancy industrial machines made quilts? It took a few weeks to convince myself that this was something that I could actually make but once I took the plunge I really enjoyed it. There were a few dodgy moments along the way but I am really pleased with how it turned out.
My quilt is not perfect (don't look to closely at the straightness of the lines!) and I have no idea what I am going to use it for (a bit pink and small for my bed) but I am sooo proud of it! Every time I look at it I can't believe that I made it. I learnt absolutely loads making this and next time it will be even better.

Since I mentioned I was making a quilt a few people have said that they had been thinking about doing the same so I thought I would give you a list of things that I learnt and found useful along the way. This is a bit of a jumbled list and is in no way complete or "correct" but hopefully someone out there will find it useful. Some of the points are a bit simple and may be obvious (this is definitely a beginners list!) but I put them down because they are things I want to remember next time I make a quilt. Hopefully this will be helpful to someone:
1. Making a quilt (even a simple one) takes quite a long time. When you are used to making little softies and pin cushions that can be done in less than a day this is a bit of a shock! The sense of achievement you get when you complete something keeps me motivated so I split the project into stages - choosing material, cutting material, sewing quilt top, cutting the batting and quilt back and pinning together with the top, quilting, making binding strip and finally sewing the binding onto the quilt. Splitting it down like this made it feel a lot more manageable.
2. Of all the stages cutting the pieces for the quilt top seems to be the most important. If the edges of your pieces are wonky then your quilt won't be square. I marked pieces up with a 30 cm ruler and cut my pieces by hand. I will never do this again! It took forever and was really difficult to get a decent straight line. If I make another quilt I will be investing in a rotary cutter and a decent straight edge.
3. Everything in quilting is referred to in yards and inches. This is very confusing when you have spent your whole life thinking in metric! I wasn't completely sure what a yard was until I asked my mum a couple of weeks ago. It still doesn't come naturally to me. Each time I want to work it out I have to think in stages - a yard is three foot, a foot is 12 inches, that's about 30 cm which means a yard is around 90cm, so just under a metre! I'm getting used to it slowly!
4. Don't start too big. The quilt I made is just over a metre square - much smaller than most quilts. When I was planning my quilt I was quite tempted to go bigger to make one that would fit on my bed, for example. I am SO glad I didn't. Even a metre square feels quite large and unwieldy when you are used to dealing with smaller pieces of fabric. Do your sewing on as large a table as possible - this makes it easier to move the quilt around.
5. Those fabric markers with ink that disappears after a couple of days or after washing are really useful - well worth the investment and much easier to use than chalk.

6. Once you have cut and arranged your pieces in the order you want take a break and come back and look at it again with fresh eyes - you might see a better way of arranging the pieces once your stepped back for a bit. When you are definitely happy with the arrangement take a photo so that you can refer back to it when sewing it all together. This was suggested in the book and is a really useful piece of advice. Remember to refer back to the photo - I didn't at one point thinking that I was confident I could remember the order and had to spend a boring half an hour unpicking one of my pieces!
7. When you've finished the quilt top iron it but be gentle otherwise you may stretch the fabric. On the other hand, if everything is a bit wonky a little bit of stretching can help things look more even! The book I used didn't specify how the seams should be pressed but a 10 minutes spent in Borders having a flick through some of the quilting books revealed that the general consensus was to press the seams to the side rather than open.
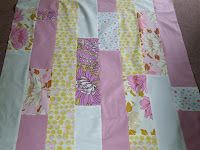
8. Once you have got the batting sandwiched between the quilt top and bottom correctly then hold it all in place by putting safety pins all over it, starting from the middle and working out. This works much better than holding it together with pins and is much quicker than basting / tacking the layers together. I believe you can buy special quilting pins to do this but I found regular safety pins worked just fine.
9. Treat your machine to a new needle before you start quilting - this makes such a difference when you are sewing through three layers of fabric. Also, check how much thread is on your bobbin regularly - it is so frustrating when you are halfway through a quilting line and your thread runs out!
10. Take regular breaks - I found if I didn't do this I got a bit impatient and ended up rushing the quilting which left me with a few wonky lines! It seems I need some practice sewing in straight lines!
11. Making your own binding is much easier than it sounds and actually really fun. Now I know how to do it I am going to use it in lots of other projects. I used one of these tools but I think it is fairly easy to do without the tool.
12. If you aren't that confident about something, in my case the binding, then it is definitely worth searching the internet. I found a flickr group for the BTRS book which had some useful discussion topics about the quilt. I also used this tutorial to check my understanding of the binding was correct. I also found this tutorial (thanks to Polka Dot Daze for the link) which uses a slightly different method but looks really useful and shows how to make binding without the tool.
13. Try not to be a perfectionist! This is my biggest problem. I could have spent ages unpicking and redoing bits of my quilt but I would never have finished. This time I was very disciplined and tried not to give into my perfectionist tendencies. I probably should have redone a few of my quilting lines but since I knew this was a learning exercise for me I decided to leave them in as reminders for next time. It is the overall effect of the quilt that matters and any little flaws just make it look a little more handmade (that's what I keep telling myself anyway!).

14. The final step is to wash and dry your quilt to give it that used, crinkly look. I can't give you any tips on that since I haven't done that yet. I keep putting it off as I am scared of it all going wrong and ruining all my hard work! When I do wash it I will let you know how it goes.
Finally, here is a list of useful quilty links I found:
Jaypeg gives some useful tips on designing your own quilt in her blog over a series of posts in January (scroll down). I will definitely be using these when I design my own quilt.
The two binding tutorials mentioned above are here and here.
And loads of free quilt patterns here, here, here, here and here. Some of these are quite tricky looking! Personally I am planning to do this one next - I love the zig zag effect.
I hope that was useful. If you made it this far down this marathon post and have any thoughts / questions / compliments / comments / abuse then please let me know!
Dotty xx
PS. Just to let you know, I am off on holiday tomorrow (woohoo!!) so there won't be any blogging around here for 10 days or so. I'm a bit worried I will miss being crafty so I have supplies with me: Issues 1&2 of Sew Hip which I have finally managed to get hold of (only issue 3 to get now!), a subversive cross stitch kit and a sketch book. Hopefully I'll return rested and full of crafty inspiration. Missing you already...


